


In this step by step tutorial we will show you how to easily create a new user account on Mac. You will learn how to create a Mac administrator account, standard account and sharing-only account.
If you have a Mac that is shared between multiple users, then this is probably the time to create a separate user account on your Mac for each user. Why? Because it not only lets every user personalize their settings but also does not affect the other user’s settings. And if you like, you can allow others to use your Mac as guests and prevent them from accessing your (or other user’s) files.
So if you want to create a new user on Mac, or even create groups, first make sure you are the ‘administrator’ of the Mac, and then follow the steps below.
Create A New User Account On Mac
Step 1: Select Apple menu > go to ‘System Preferences’ and click ‘Users & Groups’ on your Mac.
Step 2: In order to unlock it, click the lock icon.
Step 3: Now enter your administrator user name and password
Step 4: At the bottom of the list of users, click the Add ‘+’ button
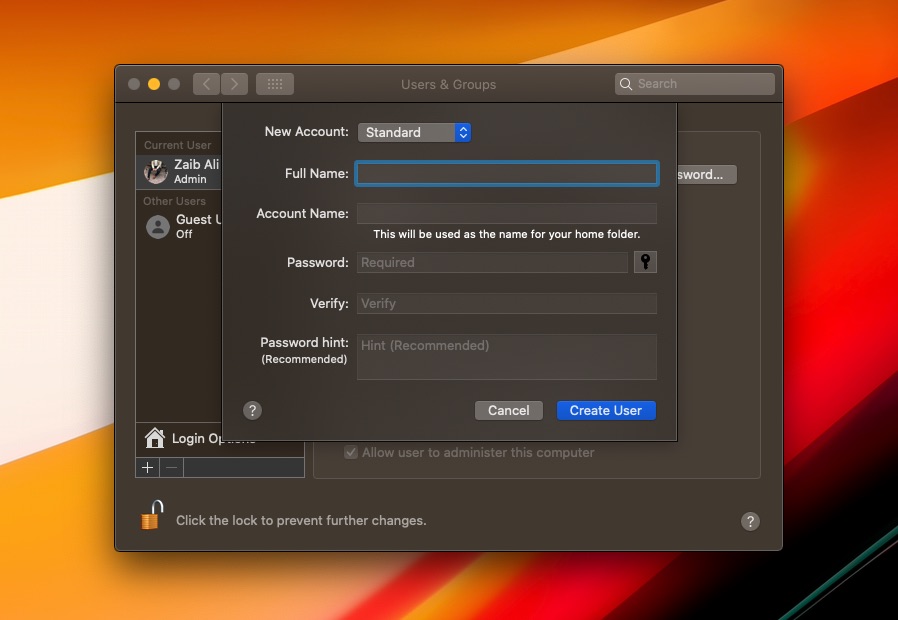
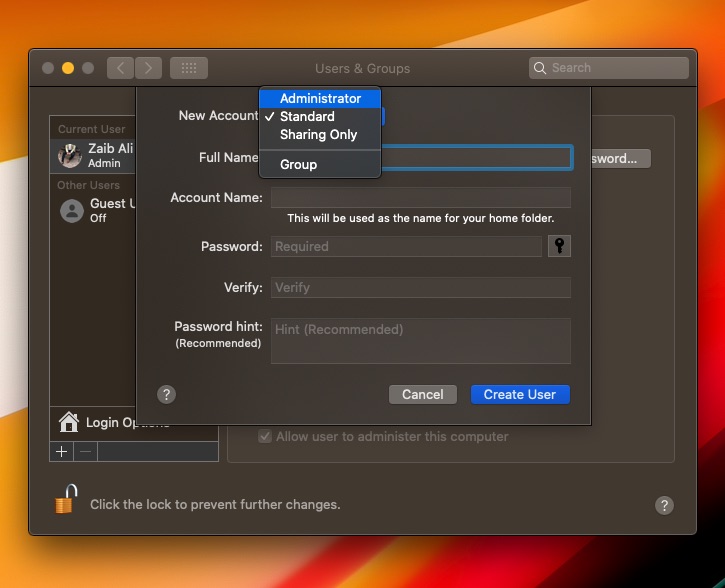
Step 5: You will see the ‘New Account’ pop-up menu
Step 6: Choose the type of a user i.e. Administrator, Standard or Sharing Only
Step 7: After selecting the user type, enter the new user’s full name, and the account name will generate automatically. You must make changes in the name now, as you cannot change this info later on.
Step 8: Type the user password, and verify it as asked. You can enter a hint for the password to make it easy for the user to recall it.
Step 9: Now, click ‘Create User’.
Step 10: Given the user account type, you can perform the following functions:
Step 11: Select, ‘Allow user to administer this computer’ for an administrator
Step 12: Select ‘Sharing Preferences’ to decide whether the user can share your files or screen.
Types of User accounts on a Mac
Administrator Account: When you set up your Mac for the first time, the new user you create at that moment is an administrator. An administrator can add and install apps, change settings, and can manage other user accounts. However, you can create new administrators and convert standards types of users to administrators. Remember, for administrator, don’t set up an automatic login. Because then, anyone could restart your device and have access to the administrator role. A word to the wise: don’t share your administrator name and passwords with anyone.
Standard Account: An administrator can set up a Standard account on Mac. A standard user is allowed to install apps and change their account settings but cannot add users or change the settings of other users.
Sharing-Only Account: As the name suggests, a user of this account can remotely access the files only, and cannot sign in or change the settings on Mac. in order to grant access to the sharing-only user, you have to edit settings in the ‘File Sharing’, ‘Screen Sharing, or ‘Remote Management’ within the ‘Sharing’ preferences.
Note: Click the ‘Help’ button on the lower-left corner to know more about each user’s options and functions.
Was this post helpful? Let us know in the comments below. Share how to add a new user account on Mac with your friends and family and add multiple users on their devices.
For more how-to posts for your Mac and iPhone, stay tuned to iOSHacker.com.
More Mac Tutorials you should check out:
- How To Move Data From Old Mac To New Mac
- How to Shutdown, Restart, Sleep or Log Out on Mac with Keyboard shortcuts only
- Turn iPhone Into A Webcam With Free Reincubate Camo App
- How To Send iMessage Text Effects On Messages For Mac


