


If you are lazy when it comes to organizing your photos and videos on your iPhone, iPad, or Mac then we have a suggestion that will make your life easy. Sometimes, no matter how hard it is to find a few photos, it seems even more difficult to organize those photos so they are easy to find at a later time.
Since most of us keep adding more photos to our collections soon we have to deal with thousands of photos, which can make it hard to find what you are looking for.
But trust me it is not that difficult to keep your iPhone or Mac photos organized, and once you have all your photos and videos organized in dedicated folders you will save a lot in time and effort.
In this post I will show you how to keep your images organized on your Apple devices, so that you can find them easily whenever you need them.
The easiest way to do this is to create the relevant albums of your pictures and place those photos and videos in the albums accordingly. But when your albums also become out of control, you can leverage the Folders feature that I just mentioned above.
For your understanding, albums contain your photos, whereas folders contain these albums. This makes organizing albums easy and is useful for those who have have a lot of albums on their Photos app.
Read on to learn how to create folders on iPhone and iPad. In the second part of this tutorial you will also learn how to create folders on Mac’s Photos app and leverage the same feature for better photo organization on your computer.
How To Create Folder On iPhone (or iPad)
In order to keep your photos or videos organized on your iPhone or iPad go to the Photos app and follow these steps.
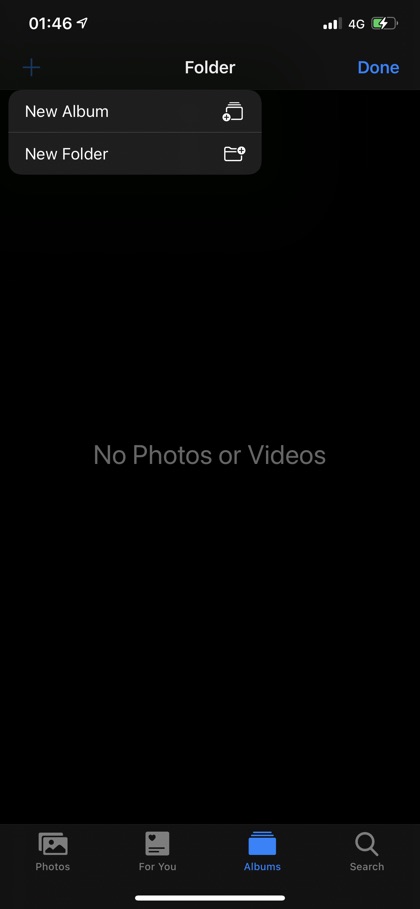
- At the bottom, select the ‘Albums’ tab.
- On the top left corner tap the ‘+’ sign and select ‘New Folder’.

- Type a name for your folder and tap ‘Save’. You can name the folder according to the pictures you are saving, for instance, for travel photos you can write the name of the place and year.
- Once you see the new folder appearing on ‘My Albums’, tap ‘Done’.

Unlike Mac, you cannot drag the albums into folders. So, storing your albums in your iPhone is not that simple, you need to save your albums inside the folders. For that matter, follow these steps:
- Select the folder and at the top, tap ‘Edit’.
- Now, tap the ‘+’ sign and pick ‘New Album’.
- Again, give your album a name, and add pictures into it now. Or simply, tap ‘Done’ and add photos later.
How To Create Folders on Mac Photos App
In order to create folders on Mac, follow the simple steps below:
- Launch the Photos app on your Mac.
- Click on ‘File’ from the menu bar and then ‘New Folder’. Or you can Right-click ‘My Albums’ in the sidebar and pick ‘New Folder’.
- Now, name your folder and hit ‘Return’.


Now you just have to drag albums into the folders, and you are done!
A second way to create a folder on your Mac is to use albums you want to include in it:
- Choose an album in the sidebar
- As you drag album onto another album, press and hold the ‘Option’ key.
- Release the key, and a new folder will be created automatically having those albums.
- Now, click the ‘Untitled Folder’ and give it a new name, and click ‘Return’.
Now that you know how to create folders in Photos app for iPhone, share with your friends and family and help them organize their pictures in an easy way.
Also read:
- How To Hide Photos On iPhone Or iPad In iOS 13 Or Later
- How To Flip A Photo On iPhone Or iPad
- How To Delete Photos From iPhone Or iPad The Right Way
- Accidentally Deleted iPhone Photos? Here’s How To Recover Them
For more useful posts for your iPhone, stay tuned to iOSHacker.com.


